verwijderen tijdelijke steunlaag

Blog post 009: Restoration update April 2020 – part 2 of 2

The steps elaborated on in blog post 008 related mainly to dismantling and removing of materials. In this blog post 009, part 2 of 2, it is all about repairing, filling in, building up.  

Step 5: Filling in the holes in the silk 

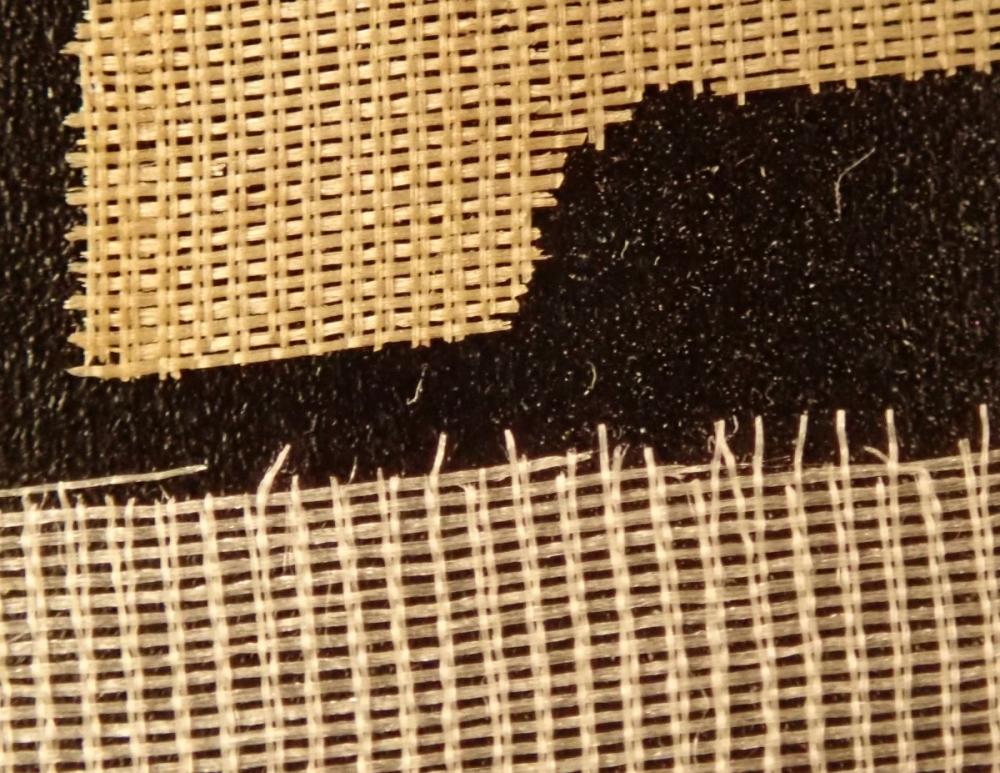
The original silk of the painting has been damaged and substantial sections have been lost over the years. The holes will be filled in with a repair silk. In order for those repairs not to stand out too much after completion of the restoration, a similar weave of painting silk has been sourced through Naoharu USAMI of Shūtokudō, Kyoto.

This silk has a very similar weave with pairs of two narrow longitudinal threads (the warp) and a wider transverse thread that crosses these (the weft). The similarity is needed to ensure the refraction of light does not differ from that of the rest of the screen. It is a very rare section of silk woven by one of the last companies to produce these types of painting silk. That company no longer exists. Furthermore, the silk was also irradiated in order to artificially age the silk, which purposely makes it dry and brittle like old silk. That procedure used to be done at the nuclear power plant of Fukushima, but since the tsunami and meltdown of 2011, this is also no longer carried out. This swatch of silk may be the last of its kind available. 

nieuwe en oude zijde
Macro photo of the original silk (top) and the repair silk (bottom).

The missing sections in the silk of the painting are filled in from the reverse side as the paintings still have their front facing. The outline of the holes is copied onto the repair silk, which is cut slightly oversize and placed over the hole. Then, with very sharp scalpels, the surplus edges of repair silk are trimmed by ‘breaking’ the brittle silk threads. That results in a repair patch that exactly matches the outline of the missing section, with the warp and weft threads of the silk butted up against the warp and the weft of the silk of the original painting. 

Step 6: Re-lining the reverse of the paintings 

Once all missing sections of silk have been filled in, it is time to re-line the paintings. A sheet of very thin Japanese mulberry paper is brushed with a starch paste and attached to the reverse side of the silk. Then, another layer is added, of a slightly thicker, heavier paper.  

Step 7: Re-lining the reverse of the paintings 

Once the two layers of lining paper are fixed in place, the painting is turned back so the front side is up. Then the rayon paper squares of the temporary front facing are taken of very carefully, to reveal the repaired and re-lined painting. The rayon paper takes with it a bit of dirt, which is trapped in the seaweed paste with which the squares were attached. 

verwijderen tijdelijke steunlaag
Removing the temporary front facing after re-lining the painting. The ship Marij & Hillegonda appears once again.

Once a front facing has been removed, the re-lined painting is transferred to a drying board. This helps the painting settle in a smooth, straightly stretched state. In the photo below, you see the result of five out of the eight paintings already having received the complete treatment up to this point. The lining paper is still oversized, appearing as an off-white border around the paintings. The sections of silk repair appear as light patches, as they have not been retouched yet. Furthermore, some vertical and horizontal lines of a lighter shade appear in the paintings. These are actually the lines created by previous use of the drying boards shining through. Even with the two layers of lining, the paintings are translucent enough for what is behind the paintings to show through. That makes it important to select the most suitable ground colour on the newly papered frames on which the paintings will be pasted. More on that issue in a later blog post! 

.
The paintings from the right, 1, 2, 6, 7 & 8 on drying boards after silk repair and re-lining. Painting 4 on the table in the foreground is repaired, re-lined and ready to go on a drying board.

Step 8: New lattices being specially constructed in Japan  

Meanwhile, new lattices have been specially constructed in Japan from white cedar. This wood is light-weight and does not release resin – which would damage the painting from the inside. With the corners mitered and strengthened with an additional small wooden board, the new frames are much more stable than the old frames.  

oude en nieuwe frames
The eight newly made white cedar frames for the panels of the folding screen. Carpentry work by Kyōgiri, Kyoto. Photo courtesy of Naoharu Usami. On the right is the old frame of panel number 4. Notice the outline of a large fan - probably a fan painting - that had been pasted onto paper that was then recycled as lattice covering paper for the screen. 


Step 9: Applying first layers of paper onto the new lattices  

The first two layers of paper (out a total of seven layers) are being applied in Japan. That tightens the panels even further. After this, the frames go back to the carpentry shop for final squaring. It is imperative that the frames are completely parallel in relation to each other. If not, the final screen will not fold properly and the paper hinges will tear. After squaring, the frames are ready to be shipped to Leiden. 

Naoki Usami attaches the first layer of paper to one of the newly made lattices. Photo courtesy of Naoharu Usami.  

Read more blogs!

Curator East Asia Daan Kok and Research Associate RCMC/Japan Davey Verhoeven write about the restoration and the results of their research of the folding screen every month. Those blog posts can be found on this overview page